Today I'm going to share a working code to make a very simple compass application for your android device. Some android device (like Huawei Y300 and Lenovo P700i) does not have full support of motions sensors so this code will not work for them.
Video Demo
Our code for today will run just like this.
Files Needed
You need to create your own compass image. For this example, I'm using a
↧
Android Compass Code Example
↧
Android EditText: Signed Number Input Type
This post about "Android EditText: Phone Number Input Type" is part of our long list of Android EditText Examples. I decided not to make these posts in only one page because this is a growing list of useful EditText code examples.
We wanted to prevent a really long page that our readers will find it hard to get what they are really looking for. Also, our discussions in the comments section
↧
↧
Android EditText: Decimal Number Input Type
This post about "Android EditText: Decimal Number Input Type" is part of our long list of Android EditText Examples. I decided not to make these posts in only one page because this is a growing list of useful EditText code examples.
We wanted to prevent a really long page that our readers will find it hard to get what they are really looking for. Also, our discussions in the comments section
↧
How to Use Joda Time in Eclipse?
Joda Time is another very useful library for your Android application development. It provides a quality library of classes to replace the Java JDK Date and Time classes.
This post is generally about how to import a library in eclipse for Android development, we just choose Joda Time library as a good example. Every time I have a post instructing to install a library, I'll probably link into
↧
Android ListView with Adapter Example
How android ListView with adapter works is not so clear to me until I read this awesome examples and article of Lucas Rocha: Performance Tips for Android’s ListView.
Today I'm going to show you the code I use whenever I wanted the user to select an "item" in an AlertDialog with ListView. If you are looking for an example AlertDialog with simple ListView (without an adapter), here's a blog
↧
↧
How to Check If An App Is Installed in Android
Checking if an app is installed in the Android device is required if you are going to start another applications's intent. There are other ways to do this but the code below is what's working for me.
I used and tested this code when I wanted to start an intent to some apps like:
Facebook
Twitter
Google Plus
Browser
Gmail
// method to check whether an app exists or not
public void
↧
Facebook Intent in Android
The app I was working on has a feature to show a Facebook page when a user clicks on a View or button. Of course, I don't want to just pass a URL and open the device browser to do that. I want the native Facebook android app to do the job! This is done with the help of Android Intents of course.
Here's how my app show that Facebook page.
Step 1: Go to the FB page and get the Facebook page
↧
Twitter Intent in Android
Showing a Twitter user page using the native twitter app adds some awesomeness in your app. Of course, we don't want to just pass a twitter URL and command the browser to show a mobile site. We want the native Twitter android app to do the job! This is done with the help of Android Intents of course.
Here's how my app show that Twitter page.
Step 1: Get the Twitter page username, in my
↧
Google Plus Intent in Android
Calling the official Google Plus app to show the Google+ page of your customers would be great. That's one feature I already worked with and now I'm ready to show you the working code I used.
Here's how I did it:
Step 1: Go to the Google+ Page and copy the page ID. In my case, it is: 101266899643014043497
https://plus.google.com/101266899643014043497/posts
Step 2: Add the following
↧
↧
Gmail Intent In Android
You can use this code when you want your users to have the ability to send email from your app, for example is the app feature where the users can send feedback, comments or suggestions directly to any given email address.
This code will open the Gmail App with the help of android intent filter.
Now you can add this code to your project or utility class.
public void openGmailApp(String[]
↧
Browser Intent in Android
This time we are going to take a look at the browser intent filter in android. I used this one when I want my users have the ability to view the subscribe form of this blog. This code basically answers the question "How do I show a web page from my app to a web browser?"
Here's the working code I used. Just follow this two step guide.
Step 1: Of course, prepare the URL you wanted to be
↧
Android ViewHolder Pattern Example
Now we are going to code the smooth scrolling of our Android ListView. In the previous post, we tried to understand how the ListView with adapter works. This time, it will be all about performance.
I did this a separate post because Android ListView is difficult to understand at times. What I have in mind is, "we have to do the basics first, and then apply the optimization."
What's with
↧
Fixed: Android Dependencies - Missing facebooksdk.jar
Recently I was working with the Facebook SDK for Android and found the error: Android Dependencies - Missing facebooksdk.jar
My project was not able to run and the eclipse console or logcat does not give a clear description of the error.
But it can be seen when you try to view the properties > java build path > libraries tab > android dependencies of your project.
It looks like the project
↧
↧
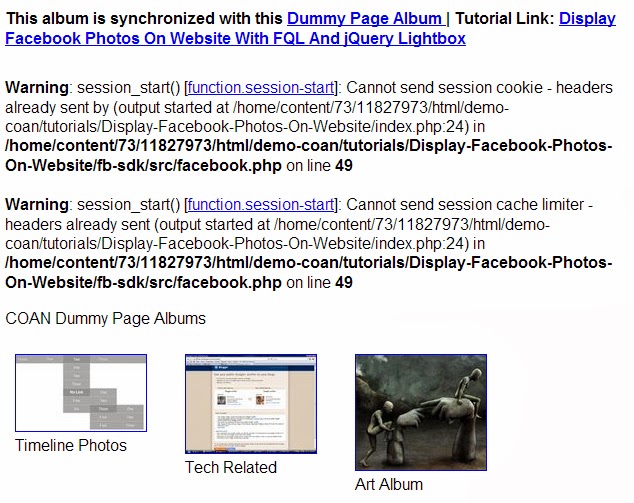
Fixed: Warning: session_start() [function.session-start]: Cannot send session cache limiter - headers already sent...
Okay, so many of you guys still ask me about how to fix these warning messages in our Facebook scripts. Today I'm going to give you two possible fixes that you can do. By the way, here's the warning message we want to remove:
Fix it by adding a session_start()
You can fix it by adding a session_start() on top of your PHP file, just right after your first line <?php tag. It looks like this:

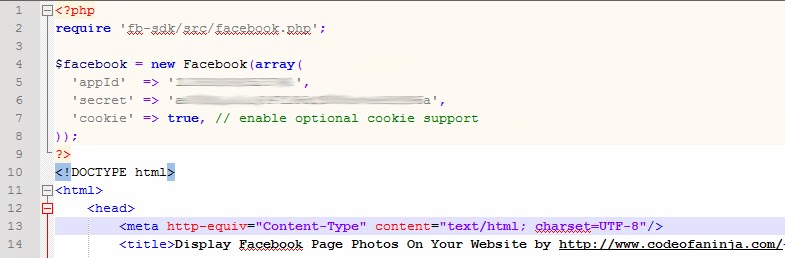
Fix it by moving Facebook instance
You can fix it by moving the Facebook class and instance code on top of your PHP file. It would look like this:
If none of them worked, you can read more here.
↧
Email Activation Code in PHP
Email activation or verification is one requirement when you're building an app with a membership feature. This is one way to detect if there's really a person behind the submitted email address. An email address is considered invalid if no person was able to open it and click the activation link.

Although nowadays, there are some alternative ways to verify the validity of an email address or user, some systems prefer the old school method, like what this post covers.
OAuth
The alternative way I was talking about is by using a social network login. Facebook, Twitter, Google+ and even Microsoft is providing something called an OAuth (Open Authorization) login, in simple terms, have you ever seen a "Login with Facebook" button?
We see one in StackOverflow login:

Unfortunately, we don't cover OAuth login in this post, but don't be sad, I might do those kinds of post in a simplified way too.
Basic Flow
The following steps shows the basic flow how email activation works.
- User fills up your sign up or registration form and submit it to the system.
- System generates unique activation code which acts like a "key"
- System sends a link with the activation code to the email provided during the sign up form.
- User opens his email inbox, found the system email and click the link with the activation code. This is like using the "key" to "unlock the door" which represents your application.
- User was sent to a link saying 'email was activated'
Where are these happening?
To give you a clearer picture where in our code the steps above happens:
Steps 1 to 3 happens in sign_up.php.
Step 4 happens in the user's email provider such as GMail, Y! Mail, etc. User should receive something like this:
![]()

Step 5 happens in our activate.php
Let's Code!
Alright, so the technologies used in this code are mostly PHP and MySQL. For sending the verification email, we used the PHP mail() function but you can also use a library like PHPMailer if you want to use SMTP such as of GMail.
libs/db_connect.php - for database connection, you know what it looks like, right? Here's the database table structure that can be used, we name it as the 'users' table.
CREATETABLE `users` (
`id`int(11) NOT NULL auto_increment,
`nickname`varchar(32) NOT NULL,
`email`varchar(264) NOT NULL,
`verified`int(11) NOT NULL COMMENT '0=no, 1=yes',
`verification_code`varchar(264) NOT NULL,
`created` datetime NOT NULL,
`modified`timestampNOT NULL default CURRENT_TIMESTAMPonupdateCURRENT_TIMESTAMP,
PRIMARY KEY  (`id`)
) ENGINE=InnoDB  DEFAULT CHARSET=latin1 AUTO_INCREMENT=134 ;
sign_up.php - where the sign up form and processing of user input is located.
<?php
// if the sign up form was submitted
if($_POST){

$email=isset($_POST['email']) ? $_POST['email'] : "";

// posted email must not be empty
    if(empty($email)){
echo"<div>Email cannot be empty.</div>";
    }

// must be a valid email address
    else if(!filter_var($email, FILTER_VALIDATE_EMAIL)){
echo"<div>Your email address is not valid.</div>";
    }

    else{

include'libs/db_connect.php';

// check first if record exists
$query="SELECT id FROM users WHERE email = ? and verified ='1'";
$stmt=$con->prepare( $query );
$stmt->bindParam(1, $email);
$stmt->execute();
$num=$stmt->rowCount();

        if($num>0){
echo"<div>Your email is already activated.</div>";
        }

        else{

// check first if there's unverified email related
$query="SELECT id FROM users WHERE email = ? and verified ='0'";
$stmt=$con->prepare( $query );
$stmt->bindParam(1, $email);
$stmt->execute();
$num=$stmt->rowCount();

            if($num>0){

// you have to create a resend verification script
echo"<div>Your email is already in the system but not yet verified. <a href='resend.php'>Resend verification?</a>.</div>";
            }

            else{

// now, compose the content of the verification email, it will be sent to the email provided during sign up
// generate verification code, acts as the "key"
$verificationCode=md5(uniqid("yourrandomstringyouwanttoaddhere", true));

// send the email verification
$verificationLink="http://download.codeofaninja.com/live/activate.php?code=".$verificationCode;

$htmlStr="";
$htmlStr.="Hi ".$email.",<br /><br />";

$htmlStr.="Please click the button below to verify your subscription and have access to the download center.<br /><br /><br />";
$htmlStr.="<a href='{$verificationLink}' target='_blank' style='padding:1em; font-weight:bold; background-color:blue; color:#fff;'>VERIFY EMAIL</a><br /><br /><br />";

$htmlStr.="Kind regards,<br />";
$htmlStr.="<a href='http://codeofaninja.com/' target='_blank'>The Code of a Ninja</a><br />";


$name="The Code of a Ninja";
$email_sender="no-reply@codeofaninja.com";
$subject="Verification Link | The Code Of A Ninja | Subscription";
$recipient_email=$email;

$headers="MIME-Version: 1.0\r\n";
$headers.="Content-type: text/html; charset=iso-8859-1\r\n";
$headers.="From: {$name} <{$email_sender}> \n";

$body=$htmlStr;

// send email using the mail function, you can also use php mailer library if you want
                if( mail($recipient_email, $subject, $body, $headers) ){

// tell the user a verification email were sent
echo"<div id='successMessage'>A verification email were sent to <b>".$email."</b>, please open your email inbox and click the given link so you can login.</div>";


// save the email in the database
$created=date('Y-m-d H:i:s');

//write query, verified = '0' means it is unverified, on activation, it becomes '1'
$query="INSERT INTO
                                users
SET
                                email = ?,
                                verification_code = ?,
                                created = ?,
                                verified ='0'";

$stmt=$con->prepare($query);

$stmt->bindParam(1, $email);
$stmt->bindParam(2, $verificationCode);
$stmt->bindParam(3, $created);

// Execute the query
                    if($stmt->execute()){
// echo "<div>Unverified email was saved to the database.</div>";
                    }else{
echo"<div>Unable to save your email to the database. <a href'http://www.codeofaninja.com/p/request-tutorial.html'>Tell Mike.</a></div>";
//print_r($stmt->errorInfo());
                    }

                }else{
                    die("Sending failed.");
                }
            }


        }

    }

}

// show your sign up or registration form
echo"<form action='".$_SERVER[PHP_SELF] ."' method='post'>";
echo"<input type='email' name='email' placeholder='Enter your email address to subscribe' required />";
echo"<input type='submit' value='Subscribe' />";
echo"</form>";
?>
activate.php - it has one job, update the the unverified to verified email address.
<?php
include'libs/db_connect.php';

// check first if record exists
$query="SELECT id FROM users WHERE verification_code = ? and verified ='0'";
$stmt=$con->prepare( $query );
$stmt->bindParam(1, $_GET['code']);
$stmt->execute();
$num=$stmt->rowCount();

if($num>0){

// update the 'verified' field, from 0 to 1 (unverified to verified)
$query="UPDATE users
set verified ='1'
where verification_code = :verification_code";

$stmt=$con->prepare($query);
$stmt->bindParam(':verification_code', $_GET['code']);

    if($stmt->execute()){
// tell the user
echo"<div>Your email is valid, thanks!. You may now login.</div>";
    }else{
echo"<div>Unable to update verification code.</div>";
//print_r($stmt->errorInfo());
    }

}else{
// tell the user he should not be in this page
echo"<div>I think you're in the wrong place.</div>";
}
?>
Code Download
I provided a download link for you just in case you want to have a copy of the code we discussed. Free code download here.
Live Demo
Please note that this demo is really live, if you enter your email, received an email with the activation link and clicked it, you're subscribed here in our code blog. See the live demo here.
Thanks for reading this email activation PHP script!
↧
12 jQuery Questions and Answers You Should Be Reading on StackOverflow
Hi guys! Below are twelve of the jQuery related questions and answers on StackOverflow that I found very useful during development. I opted to compile them here because I feel good reading those brilliant questions and answers by coders from around the world. Enjoy!
Sometimes you want some elements of your page to be visible, and if it is not visible, you want to tell the user about it. For example, a user must have a selection of data first before proceeding to new operation. If he has no selection (div is hidden), you can do a prompt that he must select something.
Ah, a drop-down list? Link # 2 above shows you how to get the user drop down list selection.
3. How to redirect a page?
Useful if you want to your users to see a page after an AJAX request, or you just want them to be redirected. I've written another example here, jQuery: Redirect onClick
Useful if you want to your users to see a page after an AJAX request, or you just want them to be redirected. I've written another example here, jQuery: Redirect onClick
For example, you want to enable a delete button if the user selected at least one data to delete, else, the delete button is disabled. I've written another example here: Check or Uncheck Checkboxes with jQuery And Get Selected with PHP
Teaches us how to select a child element and do it with faster performance (see the comment by Paul Irish).
I use return false; when I want to prevent a page refresh after clicking a submit button and doing an AJAX request.
I use jQuery .closest() method on selecting an element within a table with several rows. I probably have to write an example in another blog post, ha!
8. How would I know the existence of an element?
Useful if you want to perform something if an element exists in your page. The faster way is using if ($(selector).length) {}
Useful if you want to perform something if an element exists in your page. The faster way is using if ($(selector).length) {}
This is how you will know if a user is a male or female, using jQuery!
If you're more familiar with an element's name or don't want to add a class or id name, you can use this cool technique.
In some countries, Google's domain name is banned. So if you are using a Google hosted jQuery library, you're site won't work. Link # 12 above shows you the fall back.
This can be the first part of the list, you can add more in the comments section below, or on our Facebook, Twitter or Google+!
And as always, thanks for reading!
↧
jQuery AJAX Post Example with PHP and JSON
Today I'm gonna give you some code examples on how you can post a form and json data using jQuery AJAX. A PHP file will receive the posted data and print the response.


I think this is one of the most useful code when you're coding with jQuery, especially if you're building a web app with modules that deals with so many forms or post request in one page.
Why use jQuery for AJAX requests?
I think it is to make things easier, have shorter more readable code. You can see some code examples of doing an AJAX request without jQuery here and here.
As you can see on those links, some tasks include creating a catch for different browser XMLHttpRequest, opening the url, checking if the request is in ready state and setting the request header.
jQuery solves this by having a short, more readable syntax.
Let's code!
Alright, now we'll get straight to the code examples. We're gonna have three example below, continue to read!
1. jQuery post form data using .ajax() method
This is a great way to show someone that you are now an AJAX programmer. Because of this .ajax() piece of code in your HTML page, you may now face the world with confidence and with a beautiful smile in your face.
Just kidding. But seriously, this piece of code is useful.
<html>
<head>
<title>jQuery post form data using .ajax() method by codeofaninja.com</title>

</head>
<body>

<h1>jQuery post form data using .ajax() method</h1>
<div>Fill out and submit the form below to get response.</div>

<!-- our form -->
<formid='userForm'>
<div><inputtype='text'name='firstname'placeholder='Firstname' /></div>
<div><inputtype='text'name='lastname'placeholder='Lastname' /></div>
<div><inputtype='text'name='email'placeholder='Email' /></div>
<div><inputtype='submit'value='Submit' /></div>
</form>

<!-- where the response will be displayed -->
<divid='response'></div>

<scriptsrc="https://ajax.googleapis.com/ajax/libs/jquery/1.7.1/jquery.min.js "></script>
<script>
$(document).ready(function(){
$('#userForm').submit(function(){

// show that something is loading
$('#response').html("<b>Loading response...</b>");

/*
         * 'post_receiver.php' - where you will pass the form data
         * $(this).serialize() - to easily read form data
         * function(data){... - data contains the response from post_receiver.php
         */
$.ajax({
            type: 'POST',
            url: 'post_receiver.php',
            data: $(this).serialize()
        })
        .done(function(data){

// show the response
$('#response').html(data);

        })
        .fail(function() {

// just in case posting your form failed
alert( "Posting failed." );

        });

// to prevent refreshing the whole page page
returnfalse;

    });
});
</script>

</body>
</html>
LIVE DEMO
2. jQuery post form data using .post() method
.post() method has a more descriptive syntax, it is a shorthand of .ajax() method above. See how it was commonly used with the code below:
<html>
<head>
<title>jQuery post form data using .post() method by codeofaninja.com</title>

</head>
<body>

<h1>jQuery post form data using .post() method</h1>
<div>Fill out and submit the form below to get response.</div>

<!-- our form -->
<formid='userForm'>
<div><inputtype='text'name='firstname'placeholder='Firstname' /></div>
<div><inputtype='text'name='lastname'placeholder='Lastname' /></div>
<div><inputtype='text'name='email'placeholder='Email' /></div>
<div><inputtype='submit'value='Submit' /></div>
</form>

<!-- where the response will be displayed -->
<divid='response'></div>

<scriptsrc="https://ajax.googleapis.com/ajax/libs/jquery/1.7.1/jquery.min.js "></script>
<script>
$(document).ready(function(){
$('#userForm').submit(function(){

// show that something is loading
$('#response').html("<b>Loading response...</b>");

/*
         * 'post_receiver.php' - where you will pass the form data
         * $(this).serialize() - to easily read form data
         * function(data){... - data contains the response from post_receiver.php
         */
$.post('post_receiver.php', $(this).serialize(), function(data){

// show the response
$('#response').html(data);

        }).fail(function() {

// just in case posting your form failed
alert( "Posting failed." );

        });

// to prevent refreshing the whole page page
returnfalse;

    });
});
</script>

</body>
</html>
LIVE DEMO
3. jQuery post JSON data using .post() method
Sometimes you don't want to post data from an HTML form. You can do it by creating a JSON string, and here's how you'll be able to post it.
<html>
<head>
<title>jQuery post JSON data using .post() method by codeofaninja.com</title>

</head>
<body>

<h1>jQuery post JSON data using .post() method</h1>
<div>Click the button below to get response.</div>

<!-- our form -->
<inputtype='button'value='Post JSON'id='postJson' />

<!-- where the response will be displayed -->
<divid='response'></div>

<scriptsrc="https://ajax.googleapis.com/ajax/libs/jquery/1.7.1/jquery.min.js "></script>
<script>
$(document).ready(function(){

$('#postJson').click(function(){

// show that something is loading
$('#response').html("<b>Loading response...</b>");

/*
         * 'post_receiver.php' - where you will pass the form data
         * $(this).serialize() - to easily read form data
         * function(data){... - data contains the response from post_receiver.php
         */
$.post('post_receiver.php', { user_id: "143", username: "ninjazhai", website: "http://codeofaninja.com/" }, function(data){

// show the response
$('#response').html(data);

        }).fail(function() {

// just in case posting your form failed
alert( "Posting failed." );

        });

// to prevent refreshing the whole page page
returnfalse;

    });
});
</script>

</body>
</html>
LIVE DEMO
Posting a JSON string using the .ajax() method is also possible, you can just replace the serialize() part with your JSON string.
Posted Data
Where did the posted data go? To the file where you want the posted data to be processed! But in our example, we just print the posted data. post_receiver.php has the following code
<?php
echo"<pre>";
print_r($_POST);
echo"</pre>";
?>
DOWNLOAD CODE
↧
↧
12 Animated Web Demos Made Only with HTML and CSS3
You guys seems to like the first one, so here's another one for you! HTML and CSS are really amazing technologies that the humanity has to celebrate. Okay, that maybe exaggerated, but here are a dozen more amazing web demos with source code that might inspire you to be a better web developer. Just click the linked title of each item below, enjoy!
1. Melting Cube


8. Color Picker

9. Animated Atom

10. Funny Loading
11. Social Flip Cards
12. Beating Heart

↧
Optimize Image for Web Using Photoshop and Thoughts on Faster Web Pages
This post is supposed to be a quick-tip on how you can optimize your images for web pages. But it feels like I also want to give some thoughts about website speed. There are many websites saying that your images must be optimized for the web, that should be updated and say, "your images must be optimized for web and mobile devices" in which the amazing Adobe Photoshop can help us with.

But before the tutorial and showing you the amazing results, I just want to give some thoughts on faster web pages. Optimizing your images can benefit, you, your users and search engines such as Google.
Website Owner
I love fast loading web pages. Over a month ago, Alexa says this website's load time is around 4 to 6 seconds. That's horrible. So I decided to make this website load faster. Here are some of the things I've done to make it possible:
- I removed Infolinks ads to achieve speed in exchange for few bucks.
- I removed my Twitter and Google plus follow buttons.
- I removed Facebook like box, it loads images of Facebook users which is slow. The one you're seeing on the right sidebar is just an optimized image.
- I removed some jQuery plugins such as the "Recent Posts" plugin, the one you're seeing in the right sidebar is just a hard coded HTML.
- I limited "Related Posts" plugin to show just 5 items. Each item is a callback that makes a slow page load.
- I removed my stylesheet hosted in Google drive. Google drive HTML/CSS hosting is really slow.
- In short, lessen your HTTP requests.
Now a page from this site loads around 1 to 2 seconds. They say that it should be 1.5 seconds or less. But for now, the current speed is just okay for me. I'm still looking for ways to improve it, it's just I don't have much time for that yet.
Your Visitors
You readers or website visitors also love your website to be fast even though you won't hear them saying it to your face. Everyone loves instant nowadays, instant noodles, instant result, etc. The same with web pages, users wants to read, or should I say scan, your content and get what's in your brain in an instant. One way to do this is making your web pages load fast.
What you and your users love, Google love. If your visitors like their experience to your site, they might share it or link back to it. And Google can see it, which can give your website a chance to rank higher in search results. Currently, around 80% of this site's traffic comes from Google. Thank you Google!
How to Optimize an Image for Web and Devices using Photoshop?
Easy. Watch the video I made for you below:
The Result.
I chose to have a 'high' quality image. So from 80 kilobytes, it becomes 14 kilobytes.
Here's the 80 kilobytes version:

...and now here's the 14 kilobytes version.

As for my eyes, it makes almost no difference aside from it's file size which is more than 4x smaller compared to the original. You can download the two images above and view their properties. Or you can do the few easy steps on the video above to see for yourself.
I think this is a nice start for making your web pages load faster, and as always, thanks for reading!
↧
jQuery UI Dialog Example
Dialog boxes, modals, confirm boxes can also be done with awesomeness in jQuery UI. In this post we are going to take a look at the three jQuery UI dialog code examples I commonly use in my projects. Live demos and code download button links were also provided below. Keep on reading!

Our jQuery, jQuery UI and jQuery UI theme is hosted by hosted by Google. You can choose your jQuery UI theme here.
1. jQuery UI Basic Modal
I love modals, or a "modal window" or "modal dialog", it is a child window that pops up in your application that requires a user interaction. It can display information, gives you choices or even contain an HTML form!
In jQuery UI, when you set modal: true parameter, it will be able to dim the background of your page when showing the dialog. If it is set to false, the background will remain as is.
This is useful when a client (like mine) did not like dimming the background. But I like dimming the background when showing a dialog, so in our code below, we'll set the modal to true.
basic-dialog.html code:
<!doctype html>
<htmllang="en">
<head>
<metacharset="utf-8" />
<title>jQuery UI Dialog Modal Example by codeofaninja.com</title>

<!-- include you jquery ui theme -->
<linkrel="stylesheet"href="http://ajax.googleapis.com/ajax/libs/jqueryui/1.10.3/themes/smoothness/jquery-ui.css" />

<!-- you can have your own style -->
<style>
body {
            font-family: "Trebuchet MS", "Helvetica", "Arial",  "Verdana", "sans-serif";
            font-size: .8em;;
        }

/* dialog div must be hidden */
#basicModal{
            display:none;
        }
</style>

</head>
<body>

<!-- sample content in your page -->
<div>You can click the button to show the basic jQuery UI dialog box.</div>
<inputtype='button'value='Show basic dialog!'id='showDialog' />

<!--
    -this is the actual dialog, yes, it is included in your html body, it is just hidden
    -you can set the dialog title via the 'title' tag
-->
<divid="basicModal"title="A message from codeofaninja.com">
    Thank you for visiting codeofaninja.com!
</div>

<!-- include the jquery library -->
<scriptsrc="//ajax.googleapis.com/ajax/libs/jquery/1.9.1/jquery.min.js"></script>

<!-- include the jquery ui library -->
<scriptsrc="//ajax.googleapis.com/ajax/libs/jqueryui/1.10.3/jquery-ui.min.js"></script>

<script>
// show the dialog on click of a button
$( "#showDialog" ).click(function(){

/* -select the div you want to be a dialog modal, in our case it is 'basicModal'
       -you can add parameters such as width, height, title, etc. */
    $( "#basicModal" ).dialog({
        modal: true,
        height: 300,
        width: 400
    });

});
</script>

</body>
</html>
2. jQuery UI Confirm Dialog
Instead of the old JavaScript confirm dialog box, I use jQuery UI. This is for a better user interface and to control the number of buttons and their labels, instead of just "ok" and "cancel".
confirm-dialog.html code:
confirm-dialog.html code:
<!doctype html>
<htmllang="en">
<head>
<metacharset="utf-8" />
<title>jQuery UI Confirm Dialog Example by codeofaninja.com</title>

<!-- include you jquery ui theme -->
<linkrel="stylesheet"href="http://ajax.googleapis.com/ajax/libs/jqueryui/1.10.3/themes/smoothness/jquery-ui.css" />

<!-- you can have your own style -->
<style>
body {
            font-family: "Trebuchet MS", "Helvetica", "Arial",  "Verdana", "sans-serif";
            font-size: .8em;;
        }

/* dialog div must be hidden */
#basicModal{
            display:none;
        }
</style>

</head>
<body>

<!-- sample content in your page -->
<div>You can click the button to show the basic jQuery UI dialog box.</div>
<inputtype='button'value='Show confirm dialog!'id='showDialog' />

<!--
    -this is the actual dialog, yes, it is included in your html body, it is just hidden
    -we did not set the dialog 'title' here, we set it in the js parameter
-->
<divid="basicModal">
    Go to codeofaninja.com?
</div>

<!-- include the jquery library -->
<scriptsrc="//ajax.googleapis.com/ajax/libs/jquery/1.9.1/jquery.min.js"></script>

<!-- include the jquery ui library -->
<scriptsrc="//ajax.googleapis.com/ajax/libs/jqueryui/1.10.3/jquery-ui.min.js"></script>

<script>
// show the dialog on click of a button
$( "#showDialog" ).click(function(){

/* select the div you want to be a dialog, in our case it is 'basicModal'
    you can add parameters such as width, height, title, etc. */
    $( "#basicModal" ).dialog({
        modal: true,
        title: "Are you sure?",
        buttons: {
"YES": function() {
window.open("http://codeofaninja.com/", '_blank');
            },
"NO": function() {
                $( this ).dialog( "close" );
            }
        }
    });

});
</script>

</body>
</html>
3. jQuery UI Load Content from URL
URL to be loaded must be in the same domain or subdomain name. If you really want to load from different domain, use iframes, example code here.
In this example, we will use sample_page.php as the file of URL to be loaded, it has the following contents:
<?php
echo"Here's the sample page loaded.<br /><br />";
echo"Only a page from the same domain/subdomain can be loaded using this technique.<br /><br />";
echo"If you really want to load a page from another domain/subdomain, use an iframe.<br /><br />";
echo"<a href='http://stackoverflow.com/a/14570255/903298' target='_blank'>Example code here</a>";
?>
load-url-dialog.html code:
<!doctype html>
<htmllang="en">
<head>
<metacharset="utf-8" />
<title>jQuery UI Dialog Example by codeofaninja.com</title>

<!-- include you jquery ui theme -->
<linkrel="stylesheet"href="http://ajax.googleapis.com/ajax/libs/jqueryui/1.10.3/themes/smoothness/jquery-ui.css" />

<!-- you can have your own style -->
<style>
body {
            font-family: "Trebuchet MS", "Helvetica", "Arial",  "Verdana", "sans-serif";
            font-size: .8em;;
        }

/* dialog div must be hidden */
#basicModal{
            display:none;
        }
</style>

</head>
<body>

<!-- sample content in your page -->
<div>You can click the button to show the basic jQuery UI dialog box.</div>
<inputtype='button'value='Show basic dialog!'id='showDialog' />

<!--
    -this time, we don't have the dialog html in the body, it is in another url
    -we use the image loader to add some good effect when the system loads the url (after user click)
 -->
<imgsrc="images/ajax-loader.gif"id="imgLoader"style="display:none;" />

<!-- include the jquery library -->
<scriptsrc="//ajax.googleapis.com/ajax/libs/jquery/1.9.1/jquery.min.js"></script>

<!-- include the jquery ui library -->
<scriptsrc="//ajax.googleapis.com/ajax/libs/jqueryui/1.10.3/jquery-ui.min.js"></script>

<script>
// show the dialog on click of a button
$( "#showDialog" ).click(function(){

/* here you can specify the url */
var url ="sample-page.php";

/* container of the content loaded from a url */
var tag = $("<div></div>");

    console.log("url: "+ url);

/* show the image loader */
    $('#imgLoader').show();

    $.ajax({
        url: url,
        success: function( data ) {

            tag.html(data).dialog({
                modal: true,
                title: "Content is loaded from a URL!",
                width: 600,
                height: 450
            }).dialog('open');

/* hide the image loader */
            $('#imgLoader').hide();
            console.log("success!");
        }
    });

});
</script>

</body>
</html>
To prove that the URL contents will be appended in the body of your HTML document, see the screenshot below, I used Google Chrome's inspect element to view this live source code of the current page.
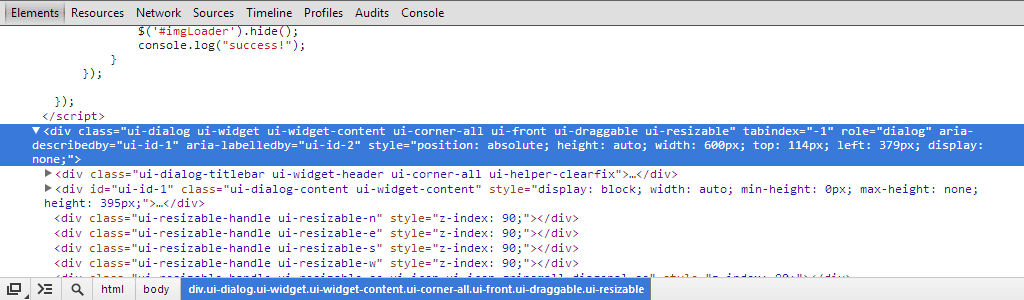
3.2 Destroy or remove the loaded URL content - by default, the jQuery UI append the URL contents in your HTML body, if you want to prevent it, we can we add the close parameter on the dialog and use the jQuery remove() method.
load-url-destroy-dialog.html code:
To prove that the URL content did not append in the HTML body, see the screenshot of the live source code below.
<!doctype html>
<htmllang="en">
<head>
<metacharset="utf-8" />
<title>jQuery UI Dialog Example by codeofaninja.com</title>

<!-- include you jquery ui theme -->
<linkrel="stylesheet"href="http://ajax.googleapis.com/ajax/libs/jqueryui/1.10.3/themes/smoothness/jquery-ui.css" />

<!-- you can have your own style -->
<style>
body {
            font-family: "Trebuchet MS", "Helvetica", "Arial",  "Verdana", "sans-serif";
            font-size: .8em;;
        }

/* dialog div must be hidden */
#basicModal{
            display:none;
        }

</style>

</head>
<body>

<!-- sample content in your page -->
<div>You can click the button to show the basic jQuery UI dialog box.</div>
<inputtype='button'value='Show basic dialog!'id='showDialog' />

<!--
    -this time, we don't have the dialog html in the body, it is in another url
    -we use the image loader to add some good effect when the system loads the url (after user click)
-->
<imgsrc="images/ajax-loader.gif"id="imgLoader"style="display:none;" />

<!-- include the jquery library -->
<scriptsrc="//ajax.googleapis.com/ajax/libs/jquery/1.9.1/jquery.min.js"></script>

<!-- include the jquery ui library -->
<scriptsrc="//ajax.googleapis.com/ajax/libs/jqueryui/1.10.3/jquery-ui.min.js"></script>

<script>
// show the dialog on click of a button
$( "#showDialog" ).click(function(){

/* here you can specify the url */
var url ="sample-page.php";

/* container of the content loaded from a url */
var tag = $("<div></div>");

/* show the image loader */
    $('#imgLoader').show();

    $.ajax({
        url: url,
        success: function( data ) {

            tag.html(data).dialog({
                modal: true,
                title: "Content is loaded from a URL!",
                width: 600,
                height: 450,
                close: function(){
                     tag.dialog('destroy').remove()
                }
            }).dialog('open');

/* hide the image loader */
            $('#imgLoader').hide();
            console.log("success!");
        }
    });

});
</script>

</body>
</html>
To prove that the URL content did not append in the HTML body, see the screenshot of the live source code below.

↧